| Photojournal
- 14 August 2007
Getting in close
Macro photography involves taking photos of small things that are quite near the camera. I've enjoyed the macro that I've done, but there have been times when I wished I could obtain greater magnifications than I was getting. There are a few ways to increase the magnification factor when shooting macro.
The easiest way is to move the lens (and camera) closer to the subject. This works spectacularly well until you encounter the minimum focal distance for the lens. If you move any closer than that, then you can't focus on the subject. So I often work at the minimum focal distance for my lens.
To overcome the focal distance limitation, you can put a bellows or extension tubes inbetween the lens and the camera. These simply lengthen the distance from the lens to the sensor (or film) and thereby shorten the lens' minimum focal distance. Once you've done this, you can move the front of the lens closer to your subject. I have a set of extension tubes that I use when I'm trying to get photos of something really small. They work very well.
Another way to increase magnification is to buy a lens with a greater magnification factor. I already had a pretty hot macro lens, so there wasn't much that I could do in this department.
One can get higher magnification than standard macro lenses, though, by using a wide-angle lens. This may sound all wrong (wide-angles have low magnification), but there's a trick: you attach it to the camera backwards. But because the threads and connectors on the two ends of a lens aren't the same, to do this you need a special fitting called a reversing ring. My friend Karla had recently gotten a reversing ring, and this inspired me to go ahead and try this alien arrangement out for myself.
On the 14th, I got the reversing ring I had ordered, along with a new wide-angle (20mm) lens that would fit it. I started playing with it by seeing just how small of a subject I could get a photo of. Here's the result. |
|
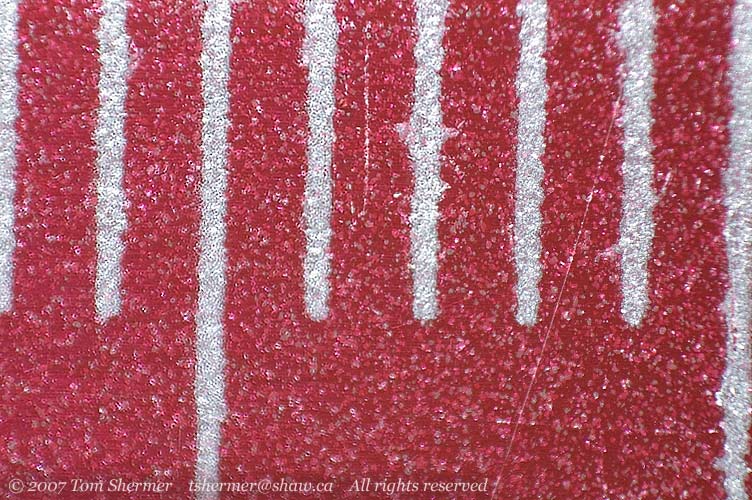 |
Those are millimeter marks on a ruler that I have, and so I can take a full-frame photo of something that's 7mm (a little more than a quarter of an inch) across. That's a significant improvement over my macro lens, which will take a picture of something 23mm across.
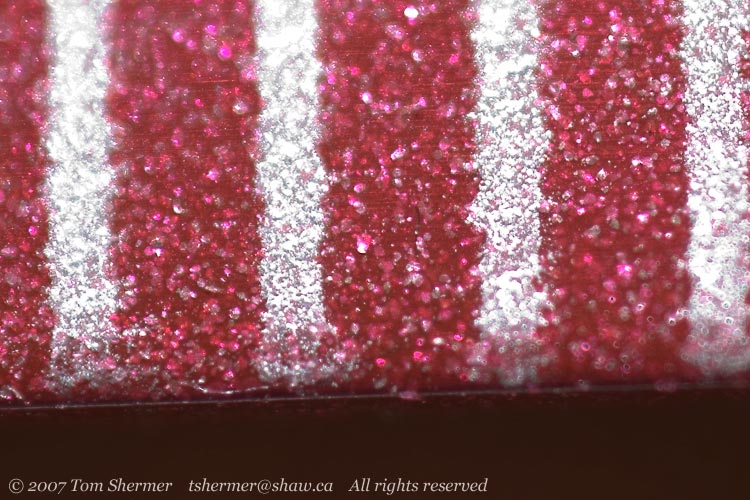
Here's a much-farther-away photo of the ruler, just so you can see the setup. The constraints of my tripod and attachments and focal distance meant that I had to shoot horizontally at the ruler (rather than vertically from over top of it), so I put the ruler in the clamp to ensure it was held steady. |
|
 |
7mm wasn't the best I could do, though. Next I put my extension rings (all 68mm of extension I have) between the reversed lens and the camera. Now I could get the reversed lens closer to the subject, and I ended up with about 3.5mm across the frame. |
|
 |
That's a boatload of magnification. My camera's sensor has about 4300 pixels across, so each pixel is covering an area 3.5mm / 4300 ≈ 0.8 microns across. Resolution of less than a micron is fairly impressive.
It's not easy getting good shots at that magnification, though. The lens ends up very close to the subject, and getting light in there to light up the subject presents some challenges. (One needs very bright light for these photos...using flash is pretty much mandatory.) There's also the problem of subject and camera movement...even a miniscule motion can move the subject a large distance in the photo. And for several reasons, focussing becomes torturous, even with a focussing rail. So although I have sub-micron resolution, I probably won't be pulling it out all that often.
Given the difficulty of controlling things with the extension rings on, I decided to work without them. This was still difficult, but not as difficult. Once I get my technique down, then I'll try the rings again.
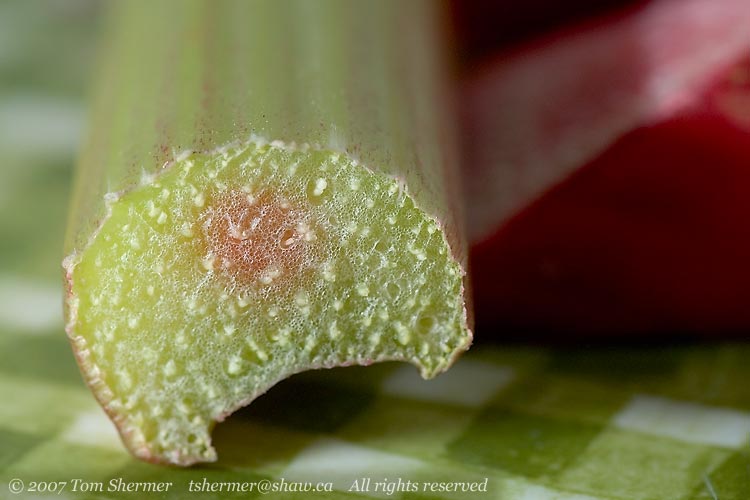
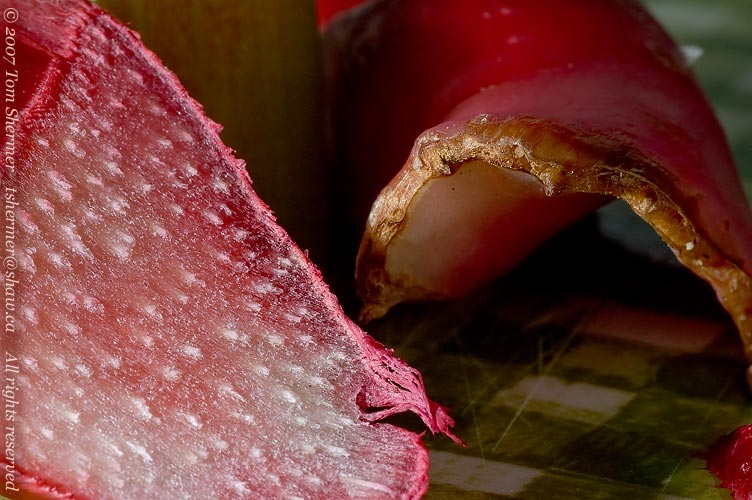
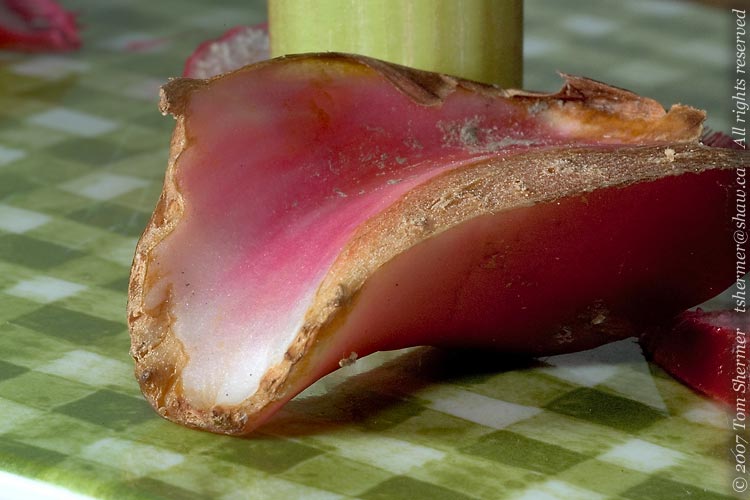
So I set up a little still life and used the reversed 20mm to take some photos. It turned out that I couldn't get much of the still life into the frame. You may want to guess what this is before reading on. |
|
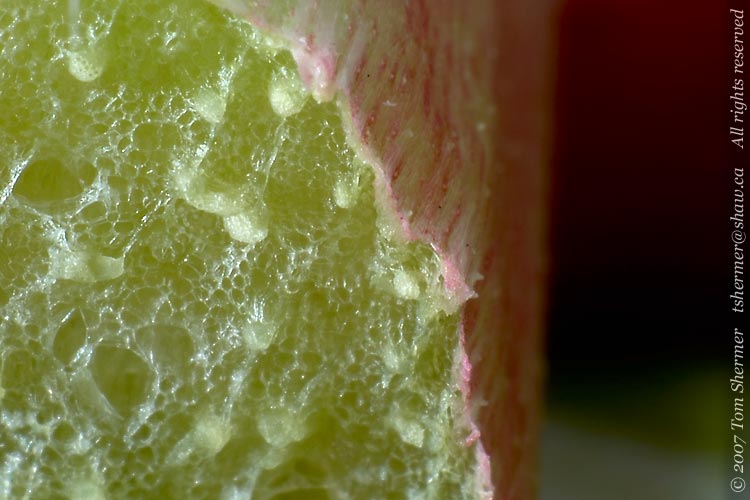 |
It's a piece of rhubarb.
For those of you who are curious about how all the camera stuff comes together, I also took a photo to document how I set up this shot. |
|
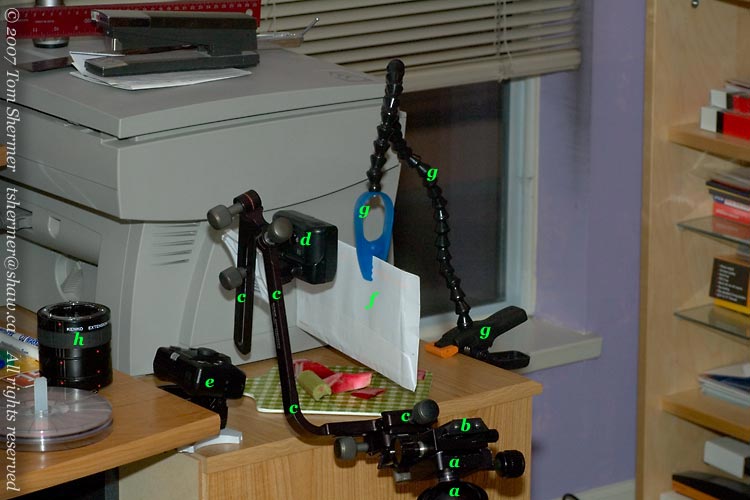 |
In that shot, (a) is my tripod head. To get the head that close to the cabinet, I had to extend one leg much farther than the others, leaving the head at a tilted angle. Mounted on the head is my focussing rail (b). That piece moves the camera towards or away from the subject, in a precisely controllable way. This is necessary to get the focus where I want it on the subject. Mounted on the focussing rail is my flash bracket (c), which extends up to the left of the rig. The camera mounts on top of the flash bracket, right above the rightmost letter c on the photo. At the other end of the flash bracket (near the leftmost letter c) a small flash unit (d) is attached, to shine light on the rhubarb from above. Another flash (e) is sitting on the cabinet to the left, to shine light from that direction. An attachment that sits on top of my camera controls these two flashes wirelessly.
I also have a white envelope (f) which I am using as a reflector, so that the right side of the subject doesn't look completely black. The envelope is held in place by a Plamp (g), which is a plastic gooseneck with clamps on both ends...a handy device for this sort of thing. The last thing of note in the photo are my extension tubes (h), which, as I said before, I had taken off of the camera.
The other shots I took with the reversed 20mm weren't worthy of the photojournal; they were mainly experiments in controlling lighting and focus. I did eventually put my 90mm macro lens on the camera, and took a few shots for comparison. These were way easier to set up and control, but they didn't give the high magnification of the reversed 20mm. |
|
 |
| |
|
 |
| |
|
 |
With that, I wrapped up for the night. I had some other photos I wanted to process in Photoshop, and it was already well into the wee hours.
Feeling awfully big,
Tom |
|
|